 Cookie settings
 Privacy policy.
 Login / Register
The User Interface (UI) (Written by Roguey, proofread by James Early)
When you adventure into space, it's a good idea to know what all the buttons do;
How are you going to build a fortune if you are pressing the eject button?
When you head into space you may see something like this;
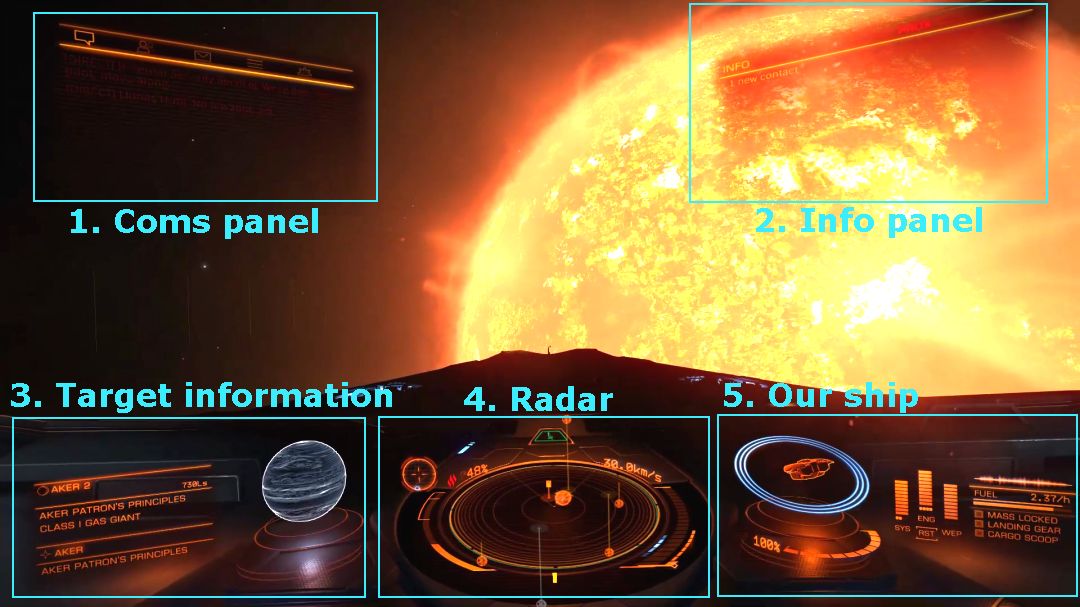
Let's look into each part of the User Interface, starting from top-left and ending on the bottom-right.
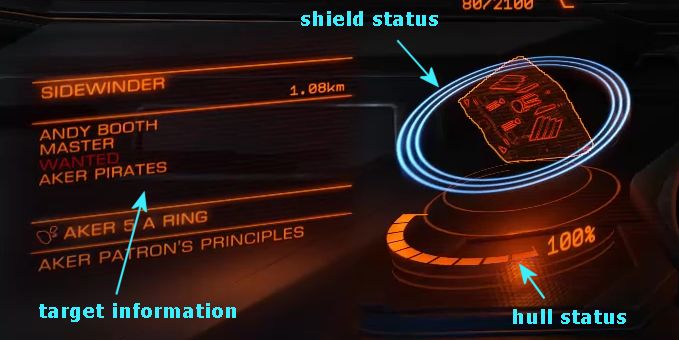
On the bottom left the first thing we see is our target. In the picture above we have locked onto a Sidewinder which is wanted (so it has a bounty on it). On the right hand-side we see a model of the ship (showing its direction relative to us). The blue circles show its shield status (100%), with the hull percentage just underneath. When a ship reaches zero hull, it will explode.
This target information isn't limited to just ships, as it will show information on stations/outposts, planets etc.
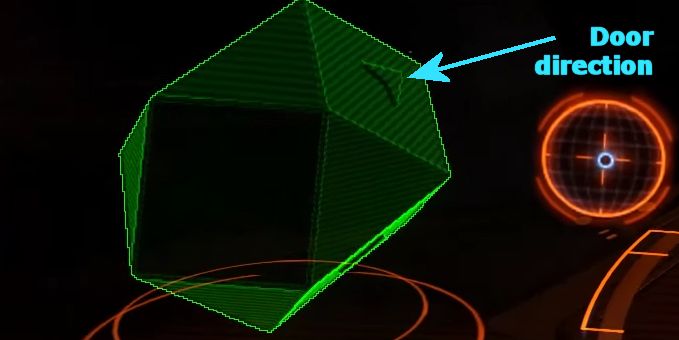
Tip: When asking for landing permission on the old style polyhedron stations (the ones which look like a giant dice), the station door direction is marked with a arrow, as shown below:

This is probably one of the most important things: the radar. The radar tells us where we are in relation to everything else. We are in the middle, with our field-of-view marked by the two lines coming from the centre.
To the left we have our heat level (ranges from 0-150%, at >100% we take damage – currently showing 27%) and to the right our speedometer (basically how fast we going, forward/backwards – currently at 191).
At the top/left of the radar section we have our goal marker. This tells us where our selected object is (whether it's a planet, station etc.). The goal marker does not work on ships, just planets, stations/outposts. If the circle is hollow then the object is behind us. If not set, this should lock-on to the nearest base.

Okay, now the last section: our ship. In this section is status of our ship, power allocation, fuel and various indicators (no, not the ones to turn left or right).
Furthest left, we see our shield and hull strength. Shields are shown with three blue-lines, each representing 33.3%. When damage is done to the shields, you will see the blue turn into a red, showing the shields are weaken. Ships without a shield or discharged shields will show three faint red lines. When the shields are down, we can suffer hull damage from combat or collision.
Okay, next we have subsystem power allocation. This tells you where your energy is diverted, to either SYS (systems such as shields), ENG (engines) or WEP (weapons). In the above example you can see that more energy has been diverted to weapons, meaning they will recharge faster. RST isn't a subsystem but resets all systems equal distribution. Subsystem power allocation can be useful to enhance a particular subsystem to make them stronger or faster.
Now to the far-right, we see our ship signature. This show us how much noise we create in space. The louder we are, the easier it is to find us on the enemy's radar. You can enter into silent-mode, where your ship will power-down many of your systems so your ship signature is non-existent. You will still be visible to the eye, just not by radar or any gimballed/turreted weapons. The next thing is fuel. We can see how much we are using and how much we have left. Our ship has two tanks, one for our current running (top) and the other for hyperspace travel (lower). When our current running runs dry, it will take some fuel from the larger hyperspace tank. However if the larger tank runs runs out, then we are basically screwed.
And finally, our indicators. These give us a quick run down of things. Are we mass-locked (ie. Something large is stopping us from using fast-travel)? Is our landing gear deployed? Is the cargo-scoop deployed? All indicators will light up with a blue square if they're on.
Let's look into each part of the User Interface, starting from top-left and ending on the bottom-right.
1. Com's panel (Top left)
Okay, let's talk about the first panel - the COMMS panel. In this section we can see messages from other commanders and NPC's. We can also send private messages and form wings (player groups).2. Info panel (Top right)
The second panel, the info panel, lets us know about events happening around us such as a proximity alarm (You are getting too close), or heading directly at something.3. Target information (Bottom left)
On the bottom left the first thing we see is our target. In the picture above we have locked onto a Sidewinder which is wanted (so it has a bounty on it). On the right hand-side we see a model of the ship (showing its direction relative to us). The blue circles show its shield status (100%), with the hull percentage just underneath. When a ship reaches zero hull, it will explode.
This target information isn't limited to just ships, as it will show information on stations/outposts, planets etc.
Tip: When asking for landing permission on the old style polyhedron stations (the ones which look like a giant dice), the station door direction is marked with a arrow, as shown below:
The radar (Bottom centre)
This is probably one of the most important things: the radar. The radar tells us where we are in relation to everything else. We are in the middle, with our field-of-view marked by the two lines coming from the centre.
| Radar key | |||
|---|---|---|---|
| ■ | NPC without hard-points deployed. | ▲ | NPC with hard-points deployed. |
| □ | Player without hard-points deployed. | △ | Player with hard-points deployed. |
| ■ | Container (white box). | ||
To the left we have our heat level (ranges from 0-150%, at >100% we take damage – currently showing 27%) and to the right our speedometer (basically how fast we going, forward/backwards – currently at 191).
At the top/left of the radar section we have our goal marker. This tells us where our selected object is (whether it's a planet, station etc.). The goal marker does not work on ships, just planets, stations/outposts. If the circle is hollow then the object is behind us. If not set, this should lock-on to the nearest base.
5. Our ship (Bottom right)
Okay, now the last section: our ship. In this section is status of our ship, power allocation, fuel and various indicators (no, not the ones to turn left or right).
Furthest left, we see our shield and hull strength. Shields are shown with three blue-lines, each representing 33.3%. When damage is done to the shields, you will see the blue turn into a red, showing the shields are weaken. Ships without a shield or discharged shields will show three faint red lines. When the shields are down, we can suffer hull damage from combat or collision.
Okay, next we have subsystem power allocation. This tells you where your energy is diverted, to either SYS (systems such as shields), ENG (engines) or WEP (weapons). In the above example you can see that more energy has been diverted to weapons, meaning they will recharge faster. RST isn't a subsystem but resets all systems equal distribution. Subsystem power allocation can be useful to enhance a particular subsystem to make them stronger or faster.
Now to the far-right, we see our ship signature. This show us how much noise we create in space. The louder we are, the easier it is to find us on the enemy's radar. You can enter into silent-mode, where your ship will power-down many of your systems so your ship signature is non-existent. You will still be visible to the eye, just not by radar or any gimballed/turreted weapons. The next thing is fuel. We can see how much we are using and how much we have left. Our ship has two tanks, one for our current running (top) and the other for hyperspace travel (lower). When our current running runs dry, it will take some fuel from the larger hyperspace tank. However if the larger tank runs runs out, then we are basically screwed.
And finally, our indicators. These give us a quick run down of things. Are we mass-locked (ie. Something large is stopping us from using fast-travel)? Is our landing gear deployed? Is the cargo-scoop deployed? All indicators will light up with a blue square if they're on.