 Cookie settings
 Privacy policy.
 Login / Register
Ship modeling tutorial (Page 7 of 8)
Written by Killertide,
Scene file construction, Tships and mini mod assembly
The scene file is very straight forward, keeping the ship rotaded at 180 in the Z angle, let's import the parts that we need with Dbox, and from the X3 folders, those are and by order:
- 1 camera in the props folder,
- 2 weapons in the props folder,
- the engine effect that we created in the engines folder,
Import them one by one and position them as you see fit. The camera however needs some attention, if it's too close to the ship, you may see trought the ship, and that's not good i think.
I've made this:
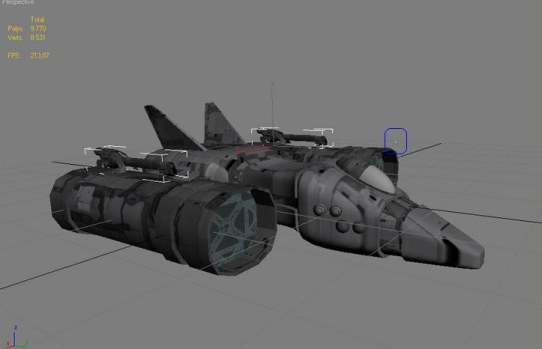
Please notice the blue box i've made for the camera. The cameradummy isn't an object, it's a small point barely visible. Position it with caution or you may heve to redu the scene file again from scratch.
After all is done, export all parts using Dbox again, as scene file, export it naming it skyman_scene
Close 3ds Max saving the file, you may need to ajust the parts or something, and it's allways good to have your work saved, to avoid the do it again part!
PS - Please notice that this is not the step to take wille using Gmax. With Gmax, you'll need a grabber, and i've yet to test or try how it's done. I'll cover it eventualy.
Now that we have a scene file, we can open the file that we exctracted with the NotePad, you'll get something like this:
VER: 6;
P 0; B skyman; N skyman; // idx 0
{ 0x2002; 0; 0; 0; 0.500000; 0.000000; 1.000000; 0.000000; -1; 1; } // 0
P 1; B cameradummy; N cameradummy; // idx 1
{ 0x2002; 0; 243; 1803; 0.000000; 0.000000; 0.000000; 0.000000; -1; 1; } // 0
P 2; B argontest; N argontest; // idx 2
{ 0x2002; 825; -329; 1514; 0.000000; 0.000000; 0.000000; 0.000000; -1; 1; } // 0
P 3; B argontest; C 1; N argontest_1; // idx 3
{ 0x2002; -829; -329; 1514; 0.000000; 0.000000; 0.000000; 0.000000; -1; 1; } // 0
P 4; B sky_eng; C 28673; N sky_eng; // idx 4
{ 0x2002; 0; -363; -2428; 0.000000; 0.000000; 0.000000; 0.000000; -1; 1; } // 0
Again, and has you can see, the paths are not there, so we need to type them manualy. Just type the location of where you got the parts to import into 3ds or Gmax from, like so:
VER: 6;
P 0; B ships\killertide\skyman; N Bships\killertide\skyman; // idx 0
{ 0x2002; 0; 0; 0; 0.500000; 0.000000; 1.000000; 0.000000; -1; 1; } // 0
P 1; B ships\props\cameradummy; N Bships\props\cameradummy; // idx 1
{ 0x2002; 0; 243; 1803; 0.000000; 0.000000; 0.000000; 0.000000; -1; 1; } // 0
P 2; B ships\props\argontest; N Bships\props\argontest; // idx 2
{ 0x2002; 825; -329; 1514; 0.000000; 0.000000; 0.000000; 0.000000; -1; 1; } // 0
P 3; B ships\props\argontest; C 1; N Bships\props\argontest_1; // idx 3
{ 0x2002; -829; -329; 1514; 0.000000; 0.000000; 0.000000; 0.000000; -1; 1; } // 0
P 4; B effects\engines\sky_eng; C 28673; N Beffects\engines\sky_eng; // idx 4
{ 0x2002; 0; -363; -2428; 0.000000; 0.000000; 0.000000; 0.000000; -1; 1; } // 0
I've used my name has a folder for my ship, you can do the same but remember it, you'll need it for the Tships file... Up next!
Before you close the scene file (in notepad), pls notice that every single entrie as a P number, has i P 0, P 1, P 2 and so on. Those are index paths.
Index paths are crutial for the Tships file assemblie, they are the "map" of the ship's parts layout. Let's see how to make a Tship's entrie then:
Open the file, it's in the types folder. For tutorial proposes i've copied the Discoverer. Copy it and in the end of the list select paste. You will be propond to select yes or no, select no so you can have the ship in the end of the list.
Now let's start building!
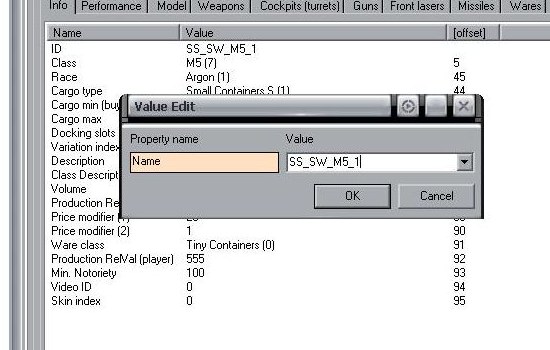
When you make a new entry, Tships txt will automaticly create the ID name of Newobject or whatever, that's not the proper way to id the ship. One of the proper ways of IDing a ship is using the code SS_SW_. For the tutorial, let's ID her SS_SW_M5_1, like so:
Next up we're going to place the info needed to X3 to find the new ship. In the model tab, only change the 2 top lines, with the paths for the ship's scene file and the cameradummy has a cockpit, like so:
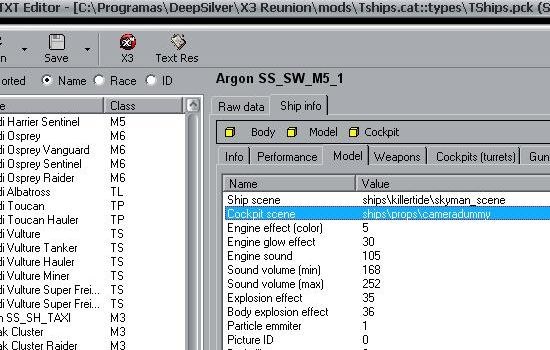
From this point on, the scene file is the most important thing you have, the index numbers are needed now.
In the Cockpits (turrets) tab, place the path to the cameradummy and the correct index number you have in the scene file, like so:

The next tab is for the weapons. Select it and remove all the wapons from there, start from the botom up, it will not delete the upper ones first. Now it's time to add our own entries.
We have two weapons, then we need to entries in there too. Click add gun, place in the path for the part in the main body part, gun count is 1 because you only have one gun per index, and remember that you need to place the index number that fits the part. The secondary body isn't used for this time of weapon, so we deactivate it by typing -1 in the path and nothing has a path, like so:
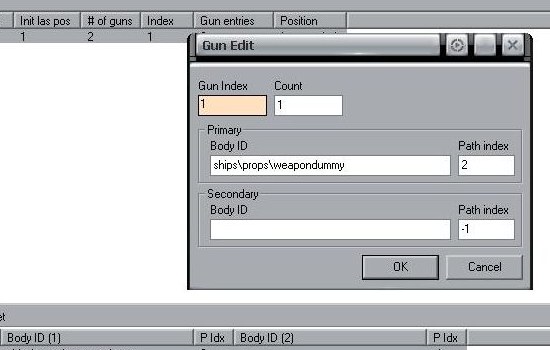
Insted of weapondummy (that we don't use in this tutorial), type the weapon that we use, the argontest wapon.
Now we are ready to build us a mini mod, so we can test our new ship!
Putting it simple, a mini mod is actualy lke making a normal one, but will less files. For this mini mod to work we are goint to need all the files that we've edited or created inside a single mod cat file, the files we have so far are:
- Ship bod
- Ship scene
- Tships file
- Engine effect
- Animations txt
- Bodies txt
- New weapon bod
We need two more files to make the mini mod work: the Jobs and JobWings files. These two files are going to bring life to your mini mod, without them, the universe would have no AI ships. To make them work, just rename those files with the name of your ship, like so:
- Jobs.skyman
- JobWings.skynam
Now with the Mod Manager, create a new mod and call it Skyman. Now let's place the files in!
Every file needs a COMPLETE path to work, i'll give you one example so you can figure out the other ones. For the ship's bod:
- objects\ships\killertide\
After the paths are done, we'll need a map to test our new ship in. I'll upload a map so you can test in. You'll need to rename the map to fit the name of the mod, Jobs and JobWings file, that's the ONLY way the mini mod will work at 100%.
Here's the map: skyman.rar
You will also need a script to make the ship spawn has you start a new game.
This is a simple ini script that you need to rename in the X3's script editor. To do that just enable the Script Editor (SE), while the script is highlighted press CAPS-C.
Beware! Sometimes you may type a c in the end of the name, the script will still work in you run it inside the SE manualy (highlight it and click r) but it will not run automaticly! Rename the script till you get the name of the ship, map, and mini mod (they share the same name!).
I've uploaded a script for you to use, many thanks to Digsin for letting use the script he made for me.
Which is called: galaxy.phorus.initplayership.rar
The ship that scrip was made to test is the phorus, i whant you to feel free to mess with it in the SE to rename it. Don't worrie, when you try to rename it it will not rename the original one, it will create a new one with the name you chosen, leaving the original intact.
Now to test our ship we only need to place the mini mod, script and map in the proper place and start a costume game with that map! Edit the script to rename it and you are ready to fly your new ship!
<< Previous Page - Next Page >>