 Cookie settings
 Privacy policy.
 Login / Register
Beginners scripting tutorial (Page 4 of 5)
Written by Roguey,
Summoning the ship
Now we know the location of the player ship, we need to summon a ship. Move your selection to <New Line> and press enter. We now have our command list selection screen once again.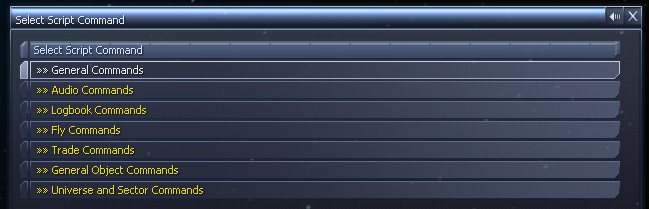
This time we want to select the create ship command, which is once again inside the General Object Commands. Now scroll down the command list (about 1 page and half) for this command:

What does this command do? ... well it creates a ship in any location, for any race. So press enter and add it to our script. We are now asked to use a variable to identify this new ship. This will allow us to add equipment, add/remove cargo etc. to this ship.
So, select <Variable> and choose something meaningful again - I recommend ship. We should now be back at our script with two lines of code. We are cooking on gas now eh?! Okies... we need to finish off adding all the extra parameters to our create ship command.
If not already selected, select the first <?> - the one after type (it will turn red):

The first setting - type tells X3 which type of ship we want to create - this can be anything in the game, from a Titan to a Lasertower. So press enter and another menu will appear asking for input. This time scroll down to the bottom and choose Select Ship Type. Now a list of ships will come up. We can either choose a ship from the whole list or filter the list. In this example lets select a Titan. So to make things easier press the right arrow key. On this tab we can filter the ships by class. The Argon Titan is of M2 class, so scroll down to M2 on the filter list and press enter. We now want to go back to the list of ships, which is done by pressing the left arrow key. Now instead of listing every ship in the game, we now have just the M2 classes. Scroll down to the bottom of the list to find the Titan (you may see different ships than below because I have my mod installed).
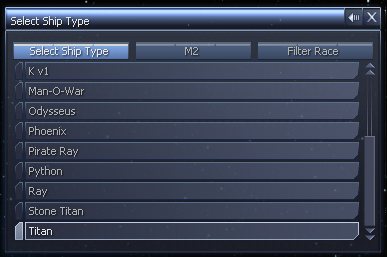
Once you have moved your high-lighter to the Titan, press enter to select it. We should now return to our wonderful script, but with one of the parameters for create ship filled in. We next need to tell the create ship command which race to give this ship too. Automatically the script editor should move our selection to the next <?> ie. Race = <?>.
Press enter and scroll all the way down to the bottom, to choose Select Race. Now a list of races will be shown. We want this ship, so you need to select player, however in the Race list player isnt shown but the pilot name. This can vary between start positions, so it can be somewhat confusing know which is the player race. One easy way to choose the player is to scroll down to the Goners, then select the name after.
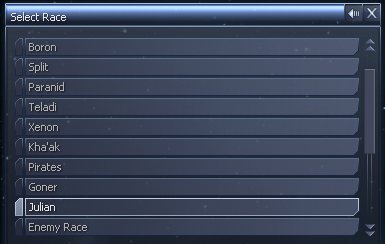
In my case the pilot name was Julian but you may something different depending on your start position. Dont worry if you do, it will still be player. After selecting it, you will return to the script with Owner = Player. I do feel this can confuse new script writers - in the list of races, it should list player not the pilot name.
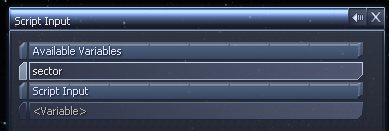
You should now have the next <?> selected ie. addto = <?>. The addto parameter tells X3 which sector to place our new Titan in. We have already got this value in a variable called sector. So press enter and choose the variable named; sector (under available variables).
Just 3 more parameters to go before we are finished with create ship. These are x, y and z. These 3 parameters tell X3 where to place the ship inside a sector. For now we want to set these to zero - ie. the center of the sector. So press enter and scroll down to <Number>. Press enter and type in a 0. Do this for the other two parameters y and z. After which, your script should look something like this:

We are nearly finished now, just one more thing to go!
<< Previous Page - Next Page >>