 Cookie settings
 Privacy policy.
 Login / Register
Ship modeling tutorial (Page 5 of 8)
Written by Killertide,
Engine effects
Let's rotate the ship in 180 in the Z angle, facing the front part back. Scene files are made like this, don't ask why... I dunno
Let's step to the semi hard part now. This is very complicared mostly because it must be done EXACLY like this, we'll be using the ship's engine poligons to make the engine fx, so this is the part that we need to be carefull.
Let's go for it!
Select the ship and re-convert it to editable poli, then pick all the polygons that you wish to convert into a working engine fx like so:
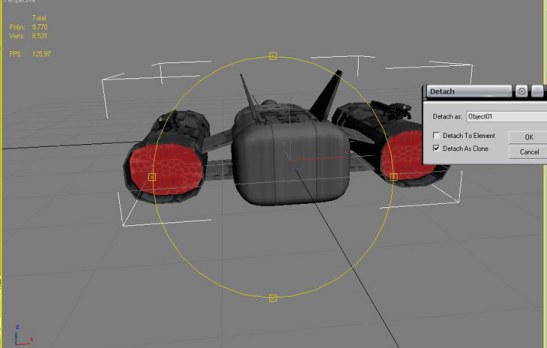
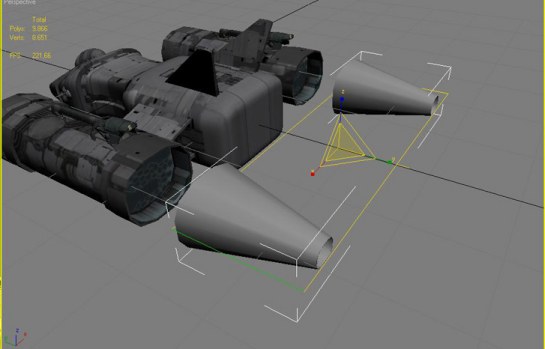
As you can see from the pic, we'll need to detach the parts, as clone, from the ship, let's do that now. Move the parts that got detached to a place that you can work with them. Use the bevel tool again to strech the engine to a point that you think that should be the max thrust in game. After you've increased it's length, use the bevel tool again to make a border and another to add deapth. You can make the blow torch like too, like i did:
Now we'll need to fix the pivots, name it and to texture it. The name should be one that you can easely identify to the ship, i've used sky_eng, use it to if you want. For the pivots, select hierachy, afect pivot only, center to object. With the move tool on, move the pivot to the place where the engine effect starts, that way X3 will know that in 0 speed the engine will stay that long. Still in the hierarchy menu, select Transform and then Scale. That's done, now for the texture.
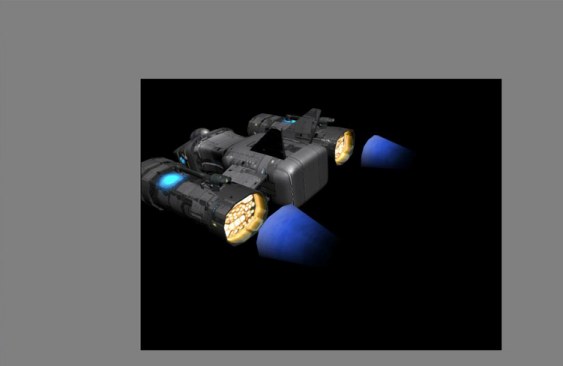
Using the -92dds texture from the package, let's import it to X3 and apply it to the engine, press F9 to see how it looks. It's in bad shape isn't it?! Use the UVW Map to fix it. The dark part of the texture must ALLWAYS face the end (Alpha channel's fault!). After you fixed it in the UVW Map menu, convert to editable poli again and it's done This should be the result:
Now you only need to reset the Xfrom of it and expot it using Dbox, like a bod, with the same name that you used in 3ds or Gmax, namely sky_eng.
The material is not the one that we need, therefor, we need to fix it. I'll use a material for the engines that I got fom Dogbite20's tutorial for engine effects, this is the material:
MATERIAL6: 0; 0x2000000; 1; engine.fx; 37; diffcompression;SPTYPE_BOOL;0; bumpcompression;SPTYPE_BOOL;0; speccompression;SPTYPE_BOOL;0;
lightcompression;SPTYPE_BOOL;0; nofiltering;SPTYPE_BOOL;0; autofree;SPTYPE_BOOL;0; Tex2;SPTYPE_BOOL;0; TexAnimStartU;SPTYPE_FLOAT;0.000000;
TexAnimStartV;SPTYPE_FLOAT;0.000000; TexAnimEndU;SPTYPE_FLOAT;0.000000; TexAnimEndV;SPTYPE_FLOAT;0.000000; TexAnimDuration;SPTYPE_FLOAT;0.000000;
TexAnimRotation;SPTYPE_FLOAT;0.000000; TexAnimOriginU;SPTYPE_FLOAT;0.500000; TexAnimOriginV;SPTYPE_FLOAT;0.500000; Brightness;SPTYPE_FLOAT;1.000000;
contrast;SPTYPE_FLOAT;1.000000; saturation;SPTYPE_FLOAT;1.000000; hue;SPTYPE_FLOAT;0.000000; colormatrix;SPTYPE_BOOL;0; g_ColorWriteEnable;SPTYPE_LONG;15;
g_Wrap;SPTYPE_LONG;0; g_CullMode;SPTYPE_LONG;2; g_AlphaBlendEnable;SPTYPE_LONG;1; g_BlendOp;SPTYPE_LONG;1; g_SrcBlend;SPTYPE_LONG;2; g_DestBlend;SPTYPE_LONG;2;
g_ZEnable;SPTYPE_LONG;1; g_ZWriteEnable;SPTYPE_LONG;0; g_ALPHATESTENABLE;SPTYPE_LONG;0; g_AlphaValue;SPTYPE_FLOAT;1.000000; t_FilterTypeDiffuse;SPTYPE_LONG;2;
t_SamplerAddressMode;SPTYPE_LONG;3; t_SamplerMaxAnisotropy;SPTYPE_LONG;8; t_MipMapLODBias;SPTYPE_FLOAT;0.000000; t_DiffuseTexture;SPTYPE_STRING;-92.dds;
t_MinFilterTypeDiffuse;SPTYPE_LONG;2;
Please notice the -92dds part, that is the info that's needed to know what is the texture that X3 will use, remeber to change that in the future if you use another color, that is the diffuse material just in case you're wondering. Cut/paste the bod of the effect into the ships\effects\engines folder and then import it to 3ds or Gmax. Position it properly.
Now the engine is made but, we still need to let X3 know that, let's poke in the types folder again. Look for the animations and bodies txt files.
I assume you are using the vannila files for this, and if so, you'll need to add some info on those files.
The -92.dds is a file that uses a "batch" of another dds files, putting it simple, it's kinda like a folder that contains the animations file. The animations txt file is just for that, if you have an animated part or texture, you need to place it there. What we need here is a engine effect, if you browse down that file, you'll see this:
TAT_TAGLOOP; NULL; 0; 0; 4;
TATF_COORDS;effects\engines\fx_engine_blue1_diff;50;0.00;0.00;
TATF_COORDS;effects\engines\fx_engine_blue2_diff;50;0.00;0.00;
TATF_COORDS;effects\engines\fx_engine_blue3_diff;50;0.00;0.00;
TATF_COORDS;effects\engines\fx_engine_blue4_diff;50;0.00;0.00;200;//79 argon engine effect
TATF_COORDS;effects\engines\fx_engine_blue2_diff;50;0.00;0.00;
TATF_COORDS;effects\engines\fx_engine_blue3_diff;50;0.00;0.00;
TATF_COORDS;effects\engines\fx_engine_blue4_diff;50;0.00;0.00;200;//79 argon engine effect
That's a vannila engine effect animation code. Has you can see, it's basicly telling X3 to loop the files (fx_engine_blue1, 2, 3 and 4) that the 79 dds (like a folder) has. These textures can be found in the dds folder btw.
As you browse to the end of the file, you'll see that the last file is the 86 push bullet, in that order, and to complete the effect pack range, you just add these files to that txt file! Has you will see bellow, i just made the effect number higher for each entry and, add +1 to the count on the top of the animations file, each time i add an entry, if we'll add those bellow, we'll have 93 entries.
Here are the codes:
TAT_TAGLOOP; NULL; 0; 0; 4;
TATF_COORDS;effects\engines\fx_engine_red1_diff;50;0.00;0.00;
TATF_COORDS;effects\engines\fx_engine_red2_diff;50;0.00;0.00;
TATF_COORDS;effects\engines\fx_engine_red3_diff;50;0.00;0.00;
TATF_COORDS;effects\engines\fx_engine_red4_diff;50;0.00;0.00;200;//-88 argon engine effect
TAT_TAGLOOP; NULL; 0; 0; 4;
TATF_COORDS;effects\engines\fx_engine_green1_diff;50;0.00;0.00;
TATF_COORDS;effects\engines\fx_engine_green2_diff;50;0.00;0.00;
TATF_COORDS;effects\engines\fx_engine_green3_diff;50;0.00;0.00;
TATF_COORDS;effects\engines\fx_engine_green4_diff;50;0.00;0.00;200;//-89 argon engine effect
TAT_TAGLOOP; NULL; 0; 0; 4;
TATF_COORDS;effects\engines\fx_engine_yellow1_diff;50;0.00;0.00;
TATF_COORDS;effects\engines\fx_engine_yellow2_diff;50;0.00;0.00;
TATF_COORDS;effects\engines\fx_engine_yellow3_diff;50;0.00;0.00;
TATF_COORDS;effects\engines\fx_engine_yellow4_diff;50;0.00;0.00;200;//-90 argon engine effect
TAT_TAGLOOP; NULL; 0; 0; 4;
TATF_COORDS;effects\engines\fx_engine_orange1_diff;50;0.00;0.00;
TATF_COORDS;effects\engines\fx_engine_orange2_diff;50;0.00;0.00;
TATF_COORDS;effects\engines\fx_engine_orange3_diff;50;0.00;0.00;
TATF_COORDS;effects\engines\fx_engine_orange4_diff;50;0.00;0.00;200;//-91 argon engine effect
TAT_TAGLOOP; NULL; 0; 0; 4;
TATF_COORDS;effects\engines\fx_engine_blue1_diff;50;0.00;0.00;
TATF_COORDS;effects\engines\fx_engine_blue2_diff;50;0.00;0.00;
TATF_COORDS;effects\engines\fx_engine_blue3_diff;50;0.00;0.00;
TATF_COORDS;effects\engines\fx_engine_blue4_diff;50;0.00;0.00;200;//-92 argon engine effect
See? again, 4 animation dds files inside a single animation file, the -92 dds for exampe! It's simple, creating these are not that simple but, Flybye made a tutorial about textures, i'll post some links in the credits post for more tutorials.
Now that the animation is done, let's let X3 know where we can find the engine bod file, and that is in the txt file named bodies.
Open it and beowse down until you find the SBTYPE_JET enties. Those are all the engine fx you can find ingame, you only need to add your's in, and again add +1 to the count that follows the SBTYPE_JET entry, like so:
SBTYPE_JET;64;
If have a ship that has more then one engine bod, or wish to add more engines to it, the operation is the same:
Add effects\engines\sky_eng; (has an example of course) and add +1 to the count.
And now you have a fully functional new engine effect
<< Previous Page - Next Page >>